The first time someone asked me whether they should use a whetstone vs diamond sharpening plate, I gave a terrible answer. I said “just get whatever’s cheapest.” That was bad advice, and I’ve spent the last several years making up for it — sharpening chisels, plane irons, kitchen knives, woodworking gouges, and custom blades I’ve forged in my own garage. I’ve run through a half-dozen diamond plates and just as many whetstones. Today I’ll give you the real answer, built on actual reps.
Here’s what most people get wrong: they treat sharpening as an afterthought. A dull tool isn’t just annoying — it’s dangerous. You apply more force, you lose control, and accidents happen. I learned this the hard way when a slipping wood chisel put a half-inch gash in my left palm. The chisel was dull. More pressure was required. The wood grain redirected the blade. That was a $400 ER visit and three stitches. I’ve been obsessive about sharp edges ever since.
This post walks through exactly how I approach sharpening in my garage workshop. I’ll cover the real differences between whetstones and diamond plates, when each one earns its place on my bench, and which specific products I actually keep in rotation. By the end, you’ll know exactly what to buy and why.
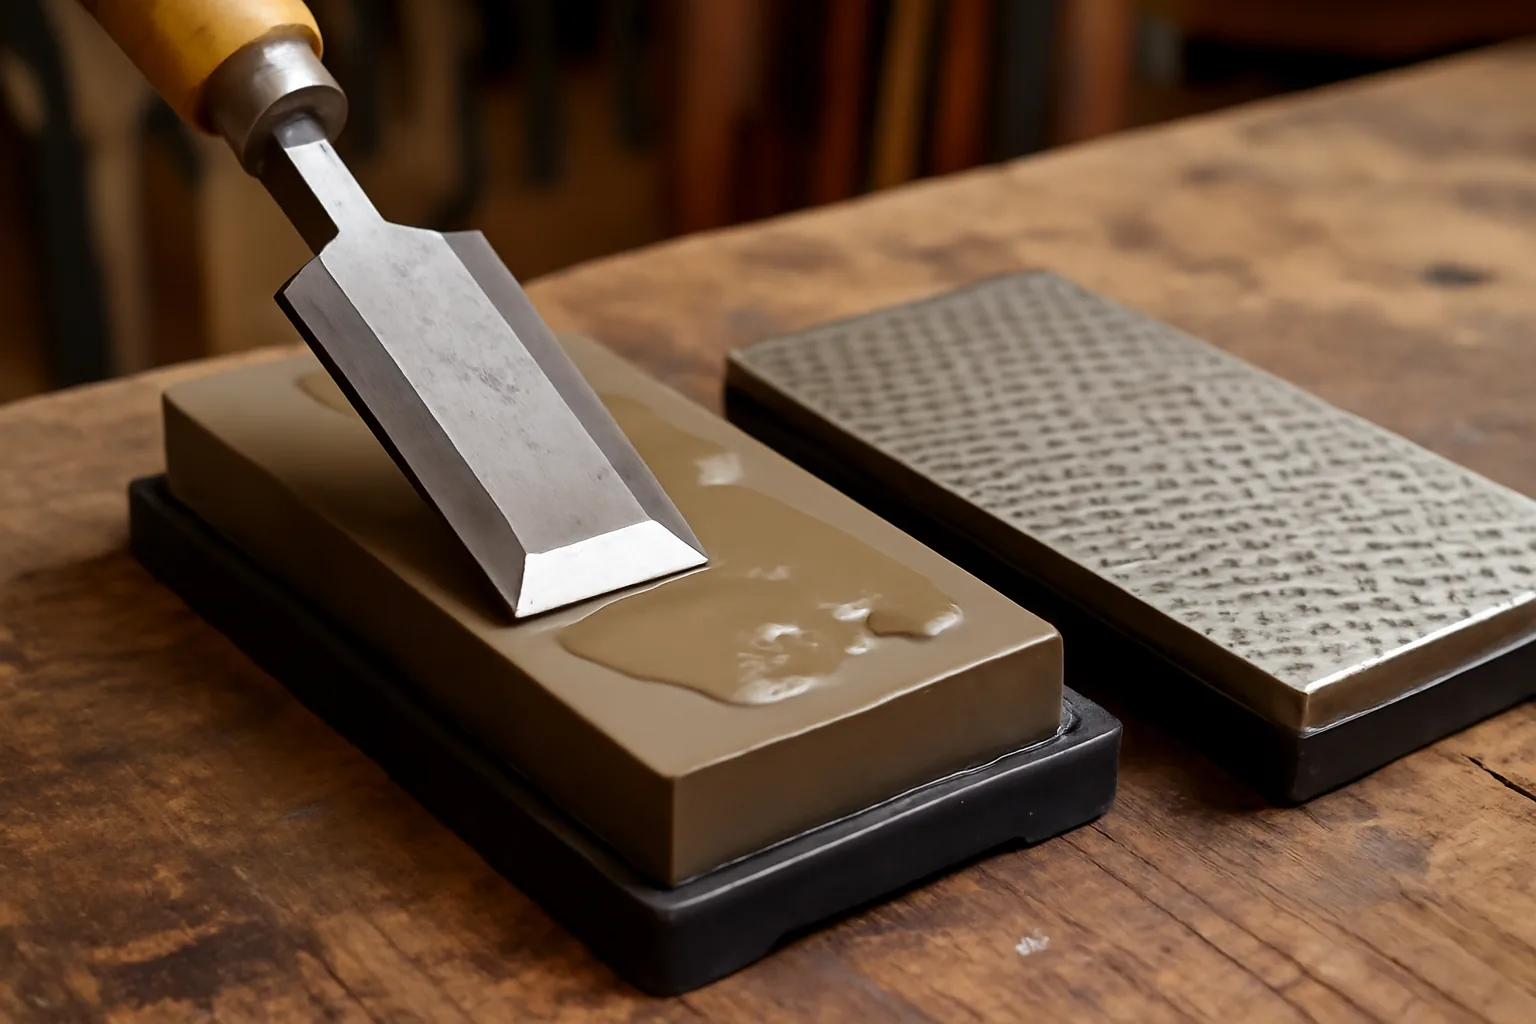
Whetstone vs Diamond Sharpening Plate: The Core Difference
A whetstone is a bonded abrasive block — usually aluminum oxide or silicon carbide — that cuts steel through abrasive wear. The stone itself slowly breaks down during use, which continuously exposes fresh cutting particles. That process is called “friability,” and it’s a feature, not a flaw. It gives whetstones a forgiving, feedback-rich feel that experienced sharpeners love.
Diamond plates work differently. They use industrial diamonds bonded to a steel or aluminum substrate. Diamond is the hardest naturally occurring material on Earth — a 10 on the Mohs hardness scale. As a result, diamond plates cut faster and don’t require soaking or flattening nearly as often. However, they feel more aggressive under your hands. Less feedback, more raw cutting speed.
In practical terms: whetstones give you finesse and a finer final edge. Diamond plates give you speed and consistency. Neither one is universally superior. The right answer depends on what you’re sharpening, how damaged the edge is, and what your skill level is. I use both — almost every sharpening session.
When I Reach for a Diamond Plate First
Diamond plates are my first call for heavy stock removal. If a tool has a chipped edge, a rolled tip, or a severely out-of-square bevel, I’m not burning through a whetstone to fix it. I’ll grab my DMT D8C coarse plate (220 grit equivalent) and work the edge back in two to five minutes flat. That same job on a whetstone could take fifteen to twenty minutes and dish the stone in the process.
For example, last spring I picked up a beat-up #5 Stanley Bailey plane at an estate sale for $12. The iron had a visible chip about 3mm deep across the cutting edge. I ran it on my coarse diamond plate for roughly eight minutes, checking progress every ninety seconds. The chip was gone, the bevel was square, and the edge was ready for finishing. A whetstone would have taken four times as long and worn unevenly.
Diamond plates also stay flat. That matters more than most beginners realize. A dished stone creates a convex bevel — and a convex bevel performs poorly. Specifically, it tends to ride on the heel of the bevel rather than the cutting edge, which means you’re not actually sharpening where it counts. For maintaining flatness without extra work, diamond plates win cleanly.
Where Diamond Plates Fall Short
Diamond plates top out around 1,200 to 1,500 grit for most consumer products. That’s nowhere near a polished, mirror-finished edge. For kitchen knives or fine woodworking tools — where you want a burr-free, hair-popping edge — you need to finish on something finer. That’s where whetstones take over completely.
Why Whetstones Still Own the Finishing Stage
A quality whetstone at 6,000 grit removes the micro-scratches left by coarser abrasives and leaves a refined, polished edge. The difference is night and day when you’re slicing paper or shaving arm hair as a sharpness test. I’ve handed the same chef’s knife to people after a 1,200-grit diamond plate finish and after a 6,000-grit whetstone finish. Every single person said the whetstone edge felt sharper. They’re right — it is sharper, measurably so.
Whetstones also offer better tactile feedback. You can feel the stone pulling slightly as you work, and experienced sharpeners use that feedback to maintain consistent angle and pressure. With a diamond plate, that connection is muted. In my experience, beginners often oversharpen or create uneven bevels on diamond plates because they can’t feel what’s happening as well.
There’s also a durability argument for whetstones on harder steels. Some high-carbon and tool steels — like the O1 tool steel I use in shop-made chisels — respond better to the slower, more controlled cut of a whetstone. Diamond plates can sometimes leave a slightly rougher scratch pattern on harder steels at equivalent grit ratings. That said, for most workshop tools and kitchen knives, the difference is minor at coarser grits.
My Actual Sharpening Workflow
Here’s exactly how I sharpen a standard workshop chisel from neglected to razor-sharp. This is the routine I’ve refined over roughly 200 hours of bench time across the last four years.
- Assess the edge. I hold the chisel under a bright work light. Reflected light on the cutting edge reveals chips, rolls, or a shiny flat spot (called the “wire edge” or a completely blunted edge).
- Coarse diamond plate (220–325 grit). If there’s a chip or major damage, I start here. Usually 3–8 minutes depending on severity.
- Medium diamond plate or whetstone (800–1000 grit). I refine the bevel and raise a consistent burr across the full width. I check for the burr by lightly dragging my thumb across the flat back of the chisel — not along the edge.
- Fine whetstone (6,000 grit). This is where the edge gets truly sharp. I take 10–15 light strokes per side, alternating, with minimal pressure.
- Strop on leather. Five to ten passes per side on a loaded leather strop removes the final micro-burr. The edge should now pass the paper-slice test cleanly.
Total time for a well-maintained chisel: about 6–10 minutes. For a neglected one: 15–25 minutes. Never rush the finishing stages. Speed at the coarse end saves time. Patience at the fine end makes the edge.
The Whetstone I Actually Keep on My Bench
I’ve tested a lot of whetstones. I’ve bought cheap ones that crumbled after six months. I’ve owned $80 Japanese water stones that were genuinely spectacular but required more maintenance than some of my tools. For most hobbyists and garage sharpeners, neither extreme makes sense.
The stone that’s stayed on my bench the longest is the KING KW65 1000/6000 Grit Combination Whetstone with Plastic Base. I’ve been using mine for about two and a half years. It’s a Japanese-made water stone with a 1,000-grit side for initial sharpening and a 6,000-grit side for finishing — both grits I use constantly. The plastic base keeps it stable on my bench and off the waterlogged rag underneath. That detail matters more than it sounds.
The 1,000-grit side cuts consistently and doesn’t load up too quickly. The 6,000-grit side produces a genuinely impressive edge — polished enough for kitchen knives, refined enough for woodworking tools. I’ve used it on everything from A2 steel plane irons to cheap stamped kitchen knives, and it performs reliably across all of them. At roughly $35–$40, it’s one of the best value-per-performance purchases I’ve made for my workshop.
One honest note: like all water stones, the KW65 will dish over time with regular use. You’ll need to flatten it periodically — I use a DMT lapping plate or silicon carbide powder on a piece of float glass. Do this every few months and the stone lasts for years. Ignore it, and you’ll be sharpening convex bevels without realizing it.
A Good Option for Beginners
If you’re just getting started and want some extra help holding a consistent angle, the KING Whetstone Starter Set is worth a look. It includes the same 1000/6000 combination stone, plus a knife angle holder, a wiping cloth, and the stable plastic base — all made in Japan. The angle holder alone eliminates one of the biggest frustrations beginners face: maintaining a consistent 20–25 degree bevel by feel. It’s a few dollars more than the standalone stone, but the bundle makes the learning curve much gentler. I’d recommend it for anyone who hasn’t spent significant time at a sharpening bench yet.
Safety Notes and Common Mistakes
Sharpening sounds low-risk. It isn’t. Here are the mistakes I see most often — and a few I’ve made myself.
- Checking sharpness by running a finger along the edge. Don’t. Drag your thumb lightly across the flat back of the blade to feel for a burr. Never run your finger parallel to the cutting edge.
- Inconsistent angle. A wobbling bevel means you’re rounding the edge, not sharpening it. Use an angle guide if you need to. No shame in it.
- Skipping grits. Going from 220 to 6,000 directly leaves deep scratches under a polished surface. The edge feels sharp but fails quickly under use.
- Sharpening on a dry diamond plate. Use water or a drop of honing oil. Dry sharpening clogs the plate faster and generates unnecessary heat.
- Storing wet whetstones improperly. A waterlogged stone left in freezing temperatures can crack. Dry your stones thoroughly before storage in cold climates.
When to Call a Pro (Or Just Walk Away)
Most sharpening tasks are completely DIY-friendly. However, a few situations warrant professional help or at least a reality check before you start.
If you have serrated knives, hollow-ground blades, or curved gouges with complex profiles, hand sharpening on a flat stone is not the right tool for the job. Serrated blades need tapered ceramic rods or purpose-built jigs. Hollow grinds are better maintained on a bench grinder with a proper wheel — typically a 60-grit or 80-grit aluminum oxide wheel spinning at 3,450 RPM. Attempting these on a flat whetstone usually makes things worse.
Similarly, if a blade is cracked, severely bent, or the heat treat has been burned out (you’ll see bluish discoloration near the edge), a whetstone can’t fix that. At that point, you’re either re-profiling on a grinder or replacing the tool. Know the difference between a sharpening problem and a metallurgy problem. They require completely different solutions.
Final Thoughts: Whetstone vs Diamond Sharpening Plate
Here’s the honest answer to the whetstone vs diamond sharpening plate debate: you need both, and they do different jobs. Diamond plates are faster, stay flatter, and dominate the coarse and medium stages. Whetstones produce finer edges, give better feedback, and are the right tool for finishing work. Using one without the other means you’re leaving performance on the table.
If I had to start from scratch with a $50 budget, here’s exactly what I’d buy: a coarse diamond plate (DMT D8C, around $35) and the KING KW65 combination whetstone for the middle and finishing stages. That $75 investment would cover 90% of everything I sharpen in my garage workshop. It’s also the setup I’d recommend to any hobbyist asking me where to start.
Sharp tools make every project better, faster, and safer. That’s not an exaggeration — it’s something I’ve confirmed a few hundred times over. Get your sharpening system sorted, build the habit, and you’ll wonder how you ever worked any other way.
This post contains affiliate links. As an Amazon Associate, I earn from qualifying purchases at no extra cost to you.