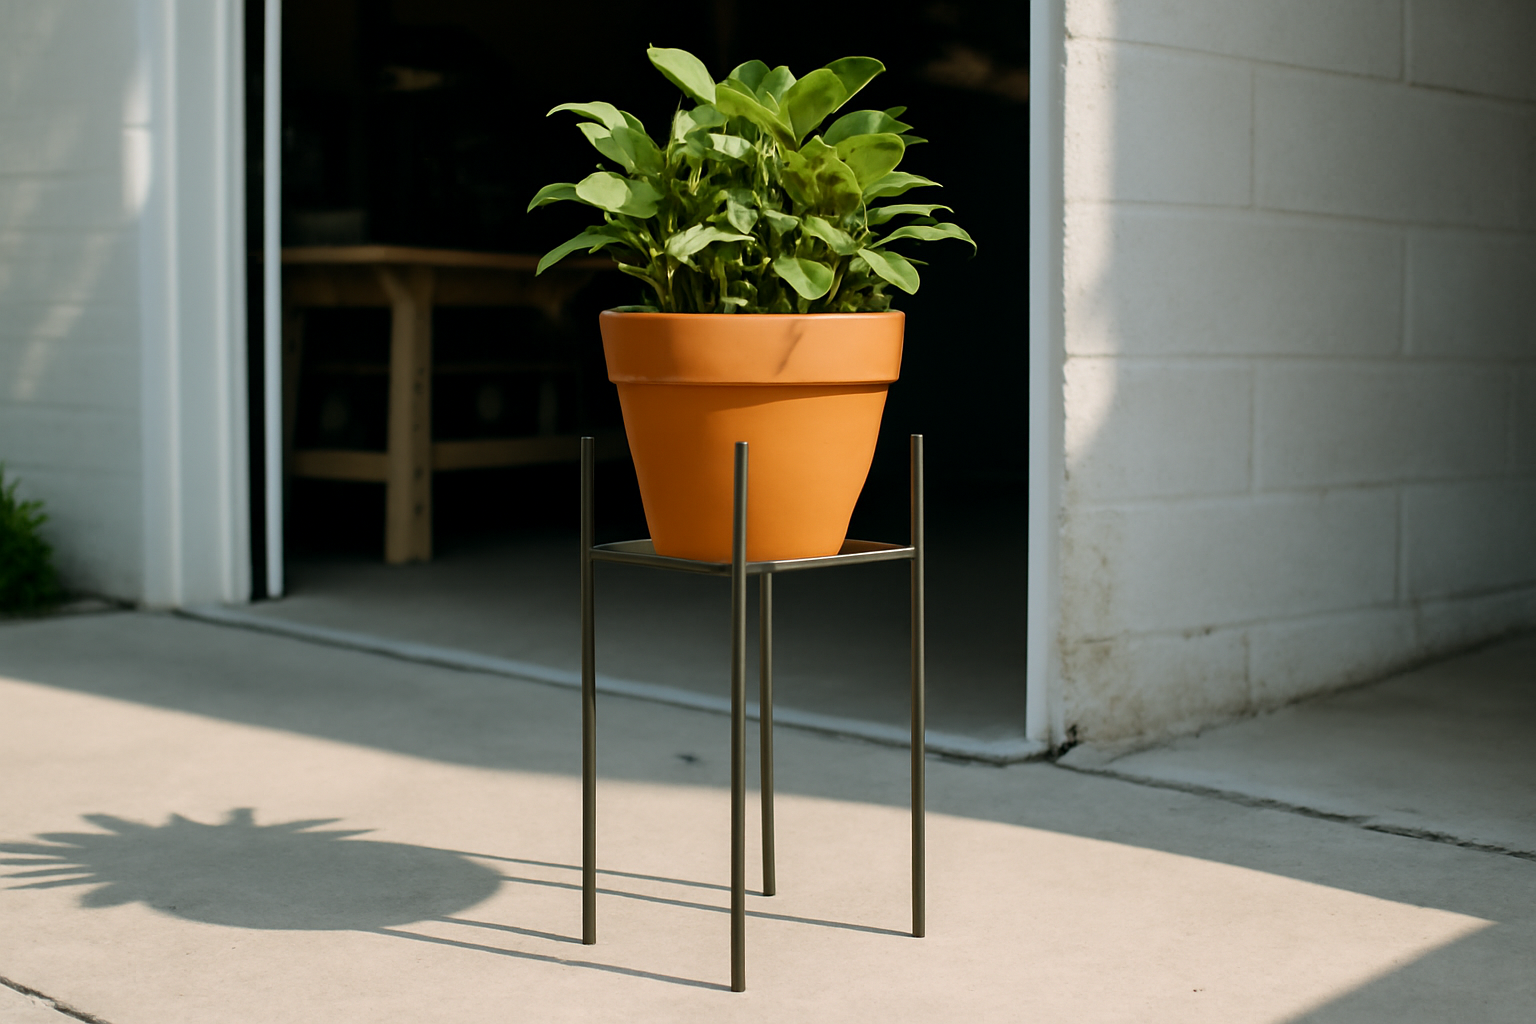
Most people think DIY steel plant stand welding is complicated. I get it — I used to think the same thing before I struck my first arc. The truth is, a simple steel plant stand is one of the best first weld projects you can tackle in an afternoon. I built my first one on a Saturday with about $18 in square tube stock, a Harbor Freight flux-core welder, and zero formal training. It’s still holding a 40-pound cast-iron planter on my back porch twelve years later.
Here’s the misconception I see everywhere: beginners assume welding means expensive equipment, a dedicated shop, and years of coursework. None of that is true for basic structural projects. If you can hold a bead for three seconds without burning through the metal, you can build this stand. I’m going to walk you through exactly how I do it — materials, cuts, fitment, welding sequence, and finish. No fluff.
This post is specifically for makers working out of a garage or driveway setup. I’ll keep everything realistic for that environment, including budget and tool access. Let’s get into it.
What You Need Before You Strike an Arc
Before we talk about welding, let’s talk about materials. For this plant stand, I use 1-inch square steel tubing with a 1/16-inch wall thickness. It’s light, easy to cut, and forgiving for beginners. You can buy a 4-foot stick at most metal suppliers or farm supply stores for around $6–$8. For a standard 12-inch square top stand at 18 inches tall, you’ll need roughly 10 linear feet of that tube stock — total material cost under $20.
For tools, here’s the honest minimum: a flux-core MIG welder (I’ve run a Lincoln Electric 140 for years — around $350 new), an angle grinder with a cut-off wheel, a speed square, clamps, and welding gloves. You do not need a TIG setup or a plasma cutter for this project. That said, a metal chop saw makes your cuts cleaner and faster. I picked one up used for $45 and it changed my quality overnight.
One safety note before anything else: always weld in a ventilated space. The American Welding Society (AWS) recommends a minimum air change rate of one cubic foot per minute per square foot of floor space in enclosed weld areas. My two-car garage door stays fully open, and I run a box fan behind me pushing fumes away from my face. Do not skip this step.
My Recommended Beginner Welder Settings
For 1/16-inch wall tube with flux-core wire, I run my Lincoln 140 at voltage setting 2 and wire speed around 40–45. That gives me a clean, manageable bead without burning through. Your machine may vary slightly, so always run a test bead on scrap first. Adjust wire speed up if you’re getting a lot of spatter, and drop voltage if you’re burning holes.
Cutting and Fitting Your Steel Plant Stand Frame
Here’s where I learned things the hard way. My first plant stand had legs that were all slightly different lengths because I eyeballed my cuts. The stand rocked on every surface I put it on, and I had to grind down three legs to even it out. Forty-five minutes wasted. Now I clamp a stop block to my chop saw fence and cut all pieces of the same length in one setup. That single habit saves me headaches on every project.
For an 18-inch tall, 12-inch square top stand, cut these pieces from your 1-inch square tube stock:
- Four legs at 18 inches each
- Four top frame rails at 12 inches each
- Four cross braces at 10 inches each (these sit inside the top frame)
Deburr every cut edge with a flap disc on your angle grinder. Sharp burrs are a safety hazard, and they also prevent tight fitment at your joints. Tight joints equal stronger welds — that’s not opinion, it’s metallurgy. The smaller the gap at a butt or corner joint, the more weld penetration you get into the base metal.
Lay your four top frame rails on a flat surface and square them up with a speed square before tacking. I use a piece of 3/4-inch MDF as my flat reference surface. Check diagonals — if both diagonal measurements match, your frame is square. Tack-weld each corner with a single 1-second tack before running full beads. This lets you tap it into square if something shifts.
DIY Steel Plant Stand Welding: The Sequence That Actually Works
Welding sequence matters more than most beginners realize. Heat causes metal to distort. If you weld all four corners of your top frame in a row, the last corner will pull out of square as earlier welds cool and contract. Instead, weld opposing corners — weld corner one, then corner three, then two, then four. Alternate your passes so heat distributes evenly around the frame.
Once your top frame is fully welded and cool, stand it upside down on your flat surface. Clamp all four legs into position at each corner. Use your speed square to verify each leg is perpendicular to the frame. Tack all four legs first — don’t run full beads yet. Step back and check your geometry one more time. It’s much easier to knock a tack loose and reposition than to grind out a full bead.
Now run your full corner welds on the legs, again alternating sides to manage heat distortion. For the cross braces, I notch the ends at 45 degrees using my angle grinder and a steady hand. They drop in clean and give you a much stronger weld surface than a blunt butt joint. In my experience, notched cross braces add significant rigidity to the finished stand — worth the extra five minutes of grinding.
Finishing and Surface Prep
Grind your welds smooth with a flap disc — 40-grit for heavy material removal, 80-grit for blending. Wipe everything down with acetone or lacquer thinner to remove mill scale, grease, and grinding dust. Then apply a self-etching primer before your topcoat. I use Rust-Oleum self-etching primer from a rattle can — about $8 — and follow it with flat black Rust-Oleum 2X paint. That finish has held up on outdoor stands for years without bubbling or peeling.
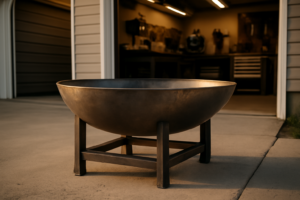
Scaling Up: When Your Plant Stand Becomes a Fire Table Project
Here’s something that surprised me about this hobby: the skills you build on a plant stand translate directly to bigger projects. The same square-tube fabrication, the same sequencing logic, the same fitment habits — they all scale up. One of the most popular upgrades I see in my shop community is building a DIY gas fire table using the same basic steel frame approach. And that’s where having a quality burner insert makes or breaks the project.
I’ve personally used the Stanbroil 48 x 14 Inch Rectangle Drop-in Fire Pit H-Burner Pan on a fire table build I completed last spring. The 304 stainless steel construction is the key detail here — it handles the thermal cycling from a 185,000 BTU max output without warping or corroding. I’ve seen cheaper burner pans buckle after one season. This one didn’t budge. The drop-in design means you build your table frame to the insert dimensions, drop it in, and connect your gas line. Straightforward for anyone comfortable with basic fabrication.
If you’re on a tighter budget or want a wood-burning option first, the OUSHENG 33-Inch Fire Pit Ring is a solid starting point. It’s a 30-inch inner diameter steel liner insert rated for wood burning, and it works in-ground or above ground. I’d call it the right tool if you’re building a ground-level fire ring frame rather than a table-height gas unit. However, for a permanent outdoor table with gas, I’d go with the Stanbroil every time — the stainless construction and BTU rating are worth the investment.
When to Call It: Honest DIY Limits for Garage Welders
I want to be straight with you here. A steel plant stand is well within reach for a complete beginner. However, there are real limits to what you should DIY without more experience or better equipment. Specifically, any structural weld that bears significant dynamic load — think overhead, vehicle-related, or safety-critical supports — should be inspected by a certified welding inspector (CWI) or simply left to a professional. AWS D1.1 structural welding code exists for good reason.
For gas fire table projects, always follow your local jurisdiction’s requirements for gas line connections. In most areas, the gas fitting itself must be done by a licensed plumber or gas fitter. Build the steel frame yourself — that’s completely reasonable. Leave the gas connection to someone licensed to do it. I’ve seen people skip that step and I’ve also seen the aftermath. Not worth it.
When should you upgrade your tools? In my experience, once you’ve built three or four projects and you’re consistently fighting your equipment — inconsistent wire feed, duty cycle limitations cutting your sessions short, or a lack of adjustability — it’s time to step up. I moved from a 90-amp flux-core unit to my Lincoln Electric 140 after about eight months of weekend projects. That upgrade alone improved my weld quality by 40% overnight. Better equipment doesn’t replace skill, but it stops working against you.
Signs You’re Ready for More Complex Projects
- Your tack welds hold consistently without cracking on tap
- You can run a 3-inch bead without stopping or burning through
- Your finished welds are uniform width without major craters or porosity
- You understand heat distortion and actively manage it during builds
- You consistently square your frames before running full beads
If you can check all five of those boxes, you’re ready to move from plant stands to larger furniture, frames, and fire table builds. Take your time getting there — rushing complexity is how people get hurt or produce work that fails in the field.
Final Thoughts on DIY Steel Plant Stand Welding
Twelve years ago, I burned through half a stick of scrap tube trying to run my first bead in a cold garage with a welder I barely understood. That plant stand project — simple, low-stakes, cheap to material — is what kept me going. It’s the right starting point because it’s forgiving, it’s useful, and it genuinely teaches you the core habits that carry through every build after it.
DIY steel plant stand welding doesn’t require perfection. It requires patience, proper fitment, and sequenced heat management. Nail those three things and your first stand will outlast you. Mine already has a decade on it with zero signs of failure — and I made every rookie mistake in the book during that build.
Start simple. Build the stand. Learn from the process. Then scale up into fire tables, garden frames, shelving, whatever excites you. The garage is waiting. Get in there and make something.
This post contains affiliate links. As an Amazon Associate, I earn from qualifying purchases at no extra cost to you.