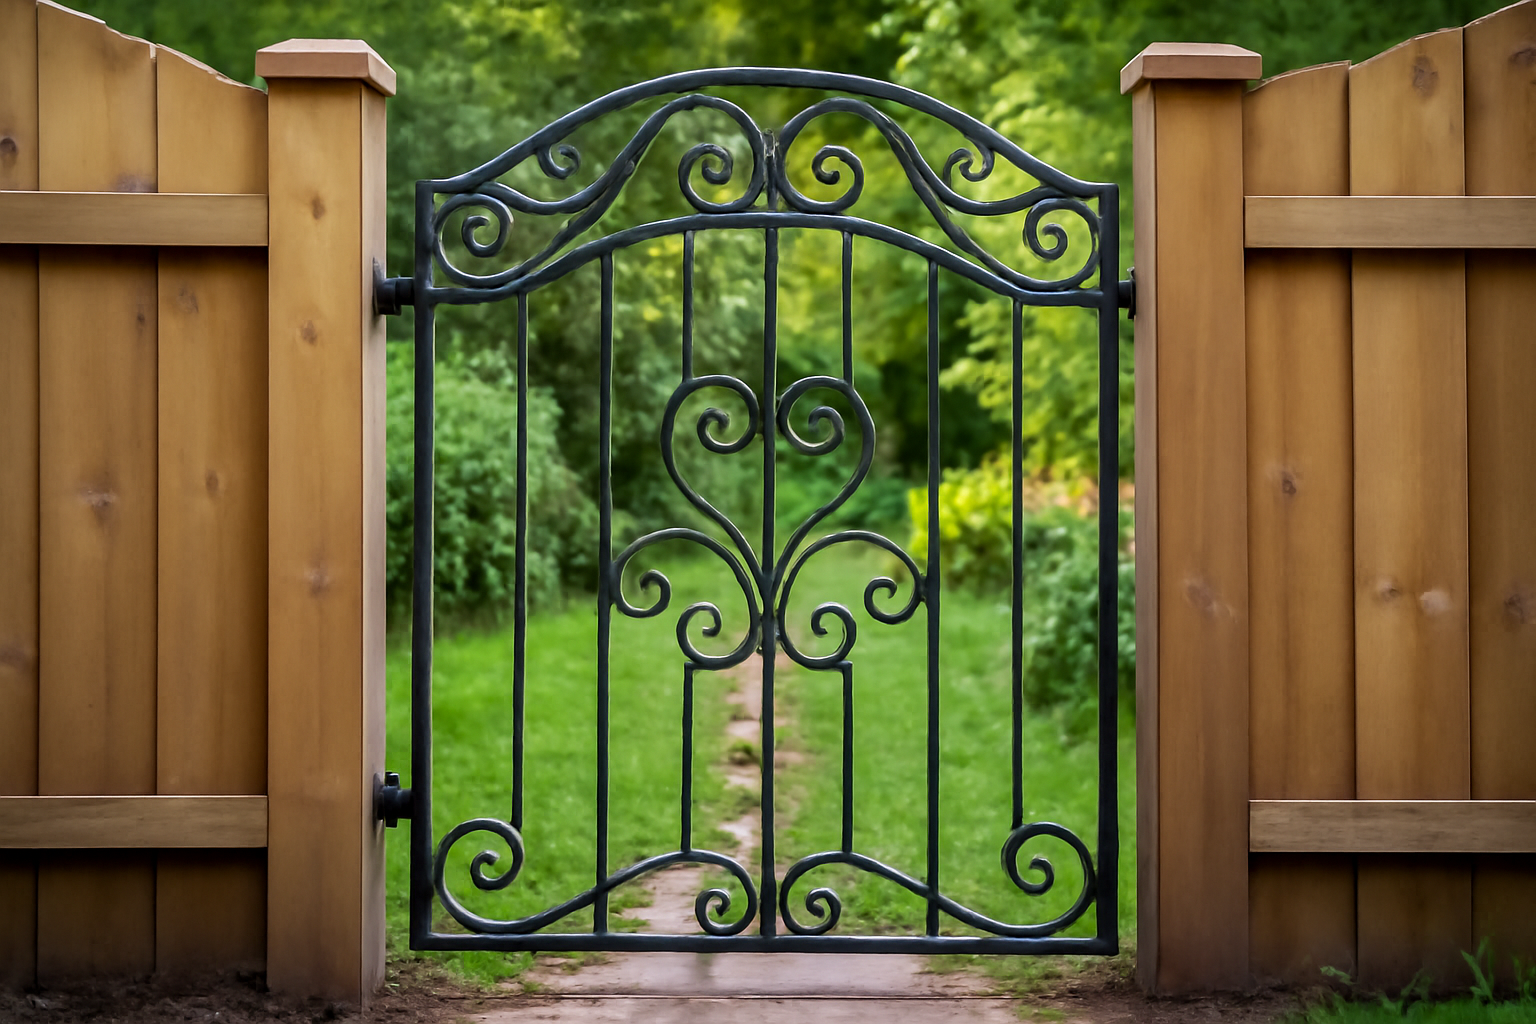
If you’ve ever priced out a custom wrought-iron garden gate, you already know the sticker shock is real. I got a quote for $1,400 installed a few years back for a simple 48-inch single-swing gate. That afternoon I walked into my garage, grabbed a piece of scrap 1-inch square tube, and decided to weld a garden gate from scratch instead. Total material cost ended up around $85. That gap — $85 versus $1,400 — is exactly why I’m writing this post.
This isn’t a “here’s a pretty photo, good luck” kind of tutorial. I’m giving you the actual stock list, the cut sheet with dimensions, and the sequencing I use to keep everything square and true. I’ve built four of these gates over twelve years in my two-car garage shop. Two of them are still hanging on my own property. The other two went to neighbors who watched me build them and asked if I could do the same for their yards.
Fair warning up front: this project requires basic MIG or stick welding skills, an angle grinder, and a decent tape measure. If you’ve never struck an arc before, this isn’t your first project. That said, if you can run a bead on flat stock without too many cold starts, you can absolutely pull this off over a weekend.
What You Need Before You Weld a Garden Gate From Scratch
Let’s talk materials first. I build most of my gates using A36 mild steel — specifically 1-inch square tube at 1/8-inch wall thickness for the outer frame, and 1/2-inch solid square bar for the infill pickets. Both are cheap, widely available at any steel supplier or metal supermarket, and they weld cleanly with ER70S-6 wire on a MIG setup.
For a standard single-swing garden gate — 48 inches wide by 48 inches tall — here’s my complete stock list. These prices reflect what I paid at my local steel supplier in late 2023, so expect some regional variation.
- (2) 1″ x 1″ x 1/8″ square tube, 10-ft lengths — for the outer frame top, bottom, and stiles (~$18 each, total $36)
- (1) 1″ x 1″ x 1/8″ square tube, 10-ft length — for the diagonal brace (~$18)
- (10) 1/2″ solid square bar, 48-inch lengths — for vertical pickets (~$3.50 each, total $35)
- (1) pair weld-on gate hinges, 3/8″ pin — (~$12 at any farm supply or online)
- (1) weld-on gate latch — (~$8)
- Rust-inhibiting primer + topcoat spray — (~$14 combined)
Total estimated materials: roughly $123. That’s still a fraction of any custom shop quote, and you own the skills afterward.
The Cut Sheet — Every Piece Labeled and Measured
A cut sheet is just a list of every piece you need, its finished length, the quantity, and which part of the gate it becomes. I write mine on a scrap of masking tape stuck to my welding table before I ever pick up a cut-off wheel. It saves expensive mistakes and keeps your material yield tight.
Here is the cut sheet for a 48″ wide x 48″ tall single-swing gate using the stock list above. All measurements are in inches. I use a 4.5-inch cutting disc on my angle grinder for these cuts, and I always mark with a Sharpie and a combination square — never eyeball it.
Outer Frame Pieces (1″ Square Tube, 1/8″ Wall)
- Top rail: 48″ — qty 1
- Bottom rail: 48″ — qty 1
- Hinge stile (left upright): 46″ — qty 1
- Latch stile (right upright): 46″ — qty 1
- Diagonal brace: 67.9″ at 45° miter cuts both ends — qty 1
The stiles are cut to 46 inches because the top and bottom rails sit on top and below them, giving you the full 48-inch exterior height. This butt-joint-over-stile approach keeps your corner welds on the flat face of the tube, which is easier to grind flush. I learned this after building my first gate the opposite way and spending an extra hour grinding ugly corner joints.
Infill Pickets (1/2″ Solid Square Bar)
- Vertical pickets: 44″ — qty 10
- Spacing between pickets: 3.6″ on center (calculated across 48″ interior, accounting for 1″ frame stiles and 10 pickets at 0.5″ each)
The 44-inch picket length drops the bar 1 inch short of each rail’s interior face, giving you room to run a clean fillet weld at top and bottom without burning through the thin tube wall. I use a simple spacer block — a scrap of 3/4-inch flat bar with notches cut at 3.6 inches — to hold consistent spacing while I tack everything in place. Fast, repeatable, no math during welding.
Sequencing Your Welds to Keep the Gate Square
This is where most first-time gate builders go wrong. They weld one corner, then the next, then the next — and by the time they’re done, the gate looks like a parallelogram. Thermal distortion is real, and mild steel moves when it heats up. AWS D1.1 structural welding guidelines address distortion control for good reason; even on a small project like this, the principles matter.
Here’s my sequence. First, I clamp the entire outer frame to my welding table using four C-clamps and verify square with a diagonal measurement — both diagonals must match within 1/16 inch. Then I tack all four corners: one tack per corner, roughly 1 inch long. After all four tacks cool, I check square again. Only then do I run full corner welds, alternating corners to distribute heat evenly.
Next come the pickets. I tack every picket top first, working left to right across the top rail. Then I tack every picket bottom, again left to right. Finally, I run full welds on all tops, then all bottoms. This back-and-forth approach keeps the heat balanced and the gate flat. In my experience, skipping this sequence is the single fastest way to build a gate that won’t hang straight.
Adding the Diagonal Brace
The diagonal brace runs from the bottom hinge corner to the top latch corner. This is structural — without it, a cantilevered gate will rack and sag within one season. The brace should be in compression under the gate’s own weight, which means it runs from the bottom of the hinge side up to the top of the latch side. Get it backwards and you’re fighting gravity instead of using it.
I cut the brace to 67.9 inches with 45-degree miters at both ends. That number comes from the Pythagorean theorem: √(46² + 46²) ≈ 65.05 for the interior diagonal, plus about 1.4 inches at each mitered end to account for the square tube geometry. Mark it, cut it, dry-fit it before welding. If it’s off by more than 1/8 inch, recut it — don’t force it.
Safety, Finish, and Hanging the Gate
Before you do anything else after welding: clean up your spatter, grind your welds flush on the visible faces, and hit every surface with a wire brush wheel. Sharp weld spatter and raw steel edges are genuine hazards — OSHA’s 1926.350 covers oxygen/fuel cutting and welding hazard control, but even in your own shop, sharp metal edges cause cuts that get infected fast. Deburr every cut end before painting.
For finish, I use a self-etching primer first — Rust-Oleum Clean Metal Primer is my go-to — followed by two coats of Rust-Oleum Protective Enamel in flat black. That combination has held up on gates I built in 2017 without significant rust through four Mid-Atlantic winters. Let the primer fully cure (24 hours minimum) before topcoating, or you’ll get bubbling. I learned this the hard way on a gate I rushed for a neighbor. Primer looked dry, but it wasn’t cured. The topcoat blistered within two weeks and I had to strip and repaint the whole thing.
Hanging the gate requires a plumb post and a little patience. I weld the hinges to the gate first, set the gate in position with temporary shims to get the correct ground clearance (I use 2 inches), then tack the hinges to the post before checking swing. Only after the swing is confirmed clean do I run full welds on the post-side hinge plates.
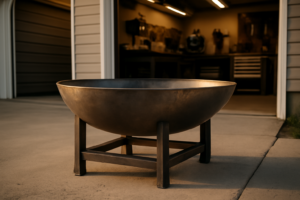
A Natural Shop Upgrade — What I Use the Extra Steel For
After a gate project, I almost always have steel offcuts and a warm shop — and my mind goes straight to the fire pit table I built a few years ago. That project paired a steel frame I welded from 1.5-inch square tube with a drop-in gas burner insert, and it has been one of the most-used things in my backyard since I finished it.
The insert I use is the Stanbroil 48 x 14 Inch Rectangle Drop-in Fire Pit H-Burner Pan. It’s 304 stainless steel with a 185,000 BTU max rating, and it drops into a frame opening you build yourself — exactly the kind of project that follows naturally after you’re comfortable fabricating steel frames like this gate. The H-burner design gives an even flame across the full 48-inch length, which looks dramatically better than a single-point burner.
I sized my fire table frame opening to match it exactly: 48 inches long by 14 inches wide at the drop-in ledge. The stainless construction has held up without any surface rust after two years of outdoor use, which is more than I can say for cheaper pan inserts I’ve tried. If you’re building a rectangular fire table after this gate project, this burner pan is genuinely worth the investment.
That said, if you want a simpler wood-burning option or you’re working with a round frame design, the OUSHENG 33-Inch Fire Pit Ring is a solid budget-friendly alternative. It’s a steel liner insert for in-ground or above-ground use — no gas plumbing required — and it works perfectly as a contained burn ring inside a welded steel frame. Less dramatic than the gas burner, but considerably easier to set up.
When to Call It — Honest Limits of the DIY Approach
This gate design works well for garden and landscaping applications where structural loads are light — foot traffic, wind, and its own weight. However, if you’re building a driveway gate that a vehicle could contact, or a security gate that needs to resist forced entry, this 1/8-inch wall tube frame is not the right spec. Step up to 3/16-inch or 1/4-inch wall tube, add a mid-rail, and consider automated opener hardware loads in your hinge selection.
Similarly, if your posts are wood — common in garden settings — make sure they’re at least 4×4 pressure-treated and set a minimum of 24 inches deep in concrete. A steel gate on an undersized wood post is a racking problem waiting to happen. The gate I built in 2019 for my back garden runs perfectly today because the post is a 4×6 set 30 inches deep. The neighbor’s gate I helped hang last year sagged within six months because his post was only set 18 inches in compacted gravel. Post depth matters as much as weld quality.
Skill-level wise: if you’re new to welding, budget extra time and practice your fillet welds on scrap tube before starting. A bad weld on a garden gate isn’t catastrophically dangerous, but a cracked picket weld can leave a sharp protruding edge at leg height. Take the time to do it right.
Final Thoughts on Building This Project From Scratch
If you weld a garden gate from scratch using the stock list and cut sheet in this post, you’ll spend around $120 in materials, one full day in the shop, and walk away with something that will outlast any box-store alternative by decades. Mild steel gates, properly primed and painted, routinely last 30 or 40 years. The $1,400 quoted gate would have looked similar hanging in my yard. This one cost me a Saturday and $85 in materials at the time.
The key takeaways: use the stile-under-rail corner joint for easier grinding, sequence your welds to control distortion, run your diagonal brace in compression, and don’t skip the primer cure time. Those four things will save you from every mistake I’ve made building these over twelve years in my garage.
Specifically, the cut sheet dimensions here are sized for a 48×48 gate — but the same logic scales directly. Need a 36-inch gate? Shorten the rails, recalculate your picket spacing, and recut the diagonal. The geometry is always the same. That scalability is what makes this design a genuinely useful template to have in your back pocket for any future garden metalwork project.
This post contains affiliate links. As an Amazon Associate, I earn from qualifying purchases at no extra cost to you.