The first time I put a freshly sharpened chisel to a piece of hardwood and it still tore instead of sliced, I almost threw the thing across the garage. I had spent 20 minutes on my sharpening stones. The edge looked sharp. But I had skipped the stropping leather strop technique — and that single missing step was the difference between a good edge and a scary-sharp one. It took me another year of frustrated sharpening sessions before I finally understood what stropping actually does and why it’s not optional.
Most hobbyists treat stropping like a bonus round. They sharpen, test the edge, and call it done. That’s a mistake. Sharpening on stones removes metal and creates an edge, but it also leaves microscopic burrs along the apex. Those burrs fold, catch, and drag. Stropping realigns that apex, polishes the steel, and removes the final wire edge. The result is something that will shave arm hair effortlessly and slice end grain like butter.
I’ve been restoring vintage tools and building custom furniture in my garage shop for going on eight years now. I’ve sharpened hundreds of chisels, plane irons, carving knives, and shop blades. In that time, stropping has become the step I never skip — and the one I teach first to anyone who asks why their edges aren’t performing. This post breaks down everything I know.
What Stropping Actually Does to an Edge
Sharpening stones work by abrading metal. Even a fine 8000-grit waterstone leaves tool marks under magnification. More importantly, the sharpening process creates a wire edge — a thin curl of metal that folds over the apex as you grind away steel from both sides. That wire edge can feel sharp initially. However, it’s fragile and inconsistent. It will fail fast.
Stropping does two things simultaneously. First, it removes that wire edge by dragging the bevel across a surface that’s slightly flexible. The leather gives just enough to press against both sides of the apex at once. Second, the abrasive compound embedded in the leather polishes the micro-scratches left by the stone. You’re essentially taking the edge from 8000-grit finish down to something closer to a mirror polish at 30,000-grit equivalent.
That polish matters more than people think. A polished apex creates less friction during the cut. It also resists corrosion better. For carving tools specifically, a stropped edge stays sharp through significantly more cuts before needing a full sharpening session. In my experience, proper stropping doubles the usable life of an edge between stone sessions. That’s not marketing talk — that’s what I’ve measured by counting cuts before rollover on consistent pine test stock.
Choosing the Right Leather Strop
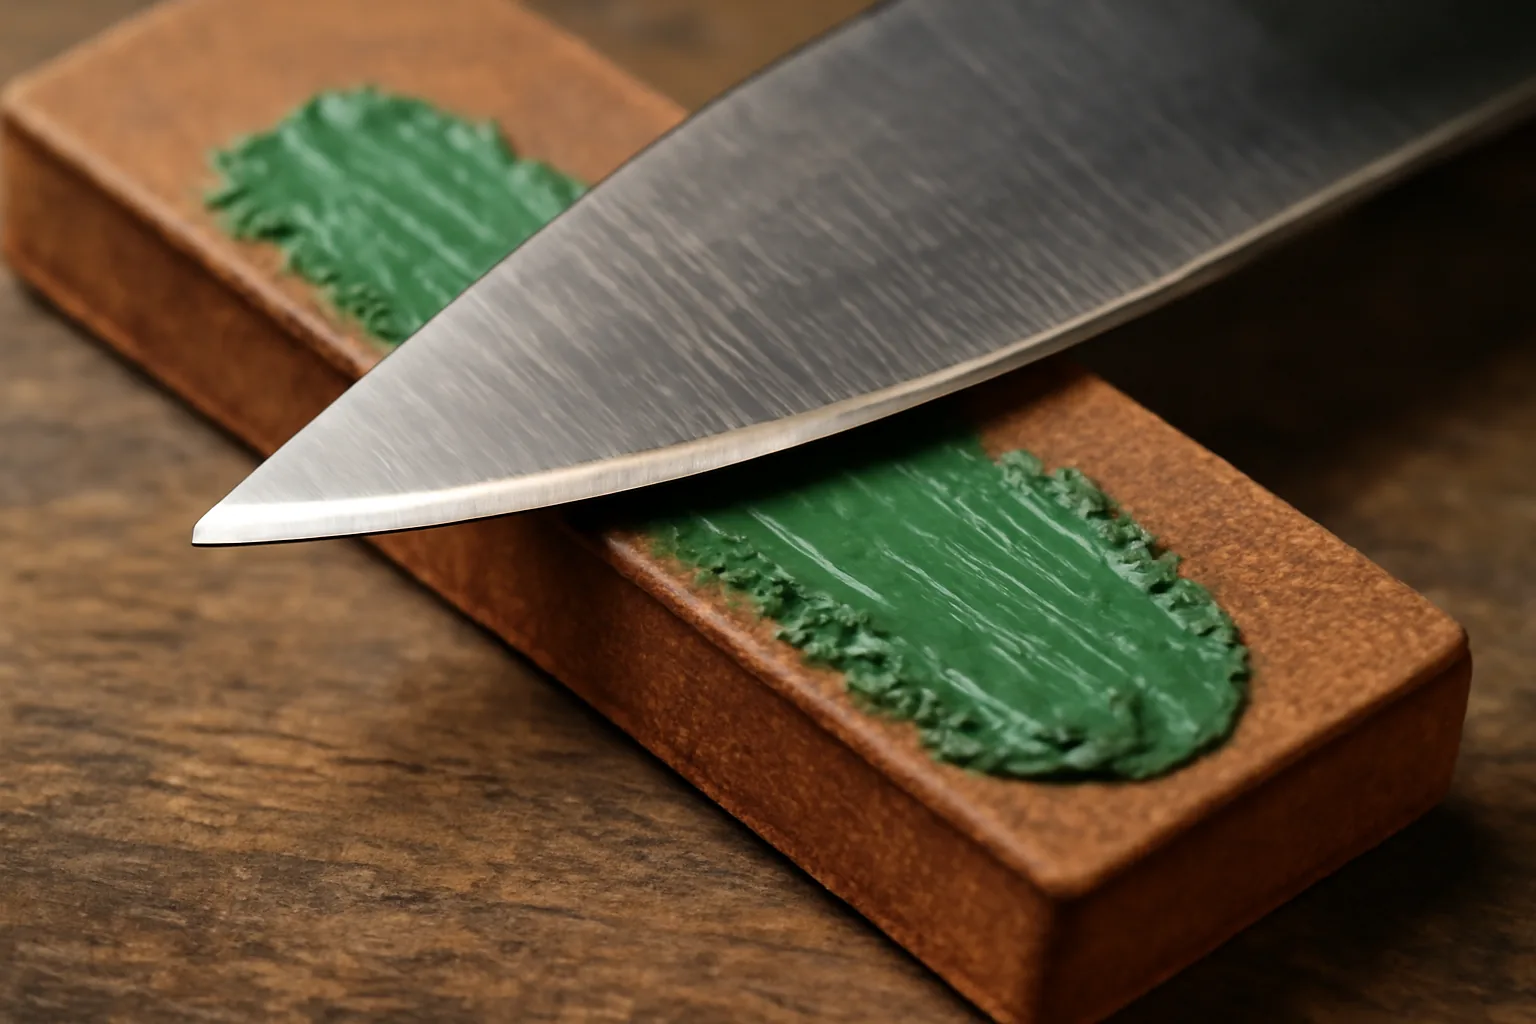
Not all leather strops are equal, and this is where a lot of beginners go wrong. You want vegetable-tanned leather, not chrome-tanned. Vegetable-tanned leather is denser and more consistent in texture. Chrome-tanned leather is softer and spongier, which rounds the edge instead of refining it. If you can press your thumbnail into the strop and it leaves a deep impression easily, it’s probably too soft.
Thickness matters too. I prefer a strop that’s at least 3/8 inch thick on a flat wooden backing. The backing keeps the surface rigid. Without it, the leather flexes too much under pressure and you’ll round the bevel without meaning to. Flat bench strops — the paddle style — are my go-to for shop tools. Hanging strops are better suited for straight razors and barber use where a more flexible surface is intentional.
Width is a practical consideration. For chisels and plane irons, I want at least a 2-inch-wide surface. Narrower strops make it hard to maintain consistent contact on wider blades. For pocket knives and carving tools, a 1.5-inch strop works fine. I keep two in my shop — a 2.5-inch bench strop for flat tools and a narrower paddle strop for curved carving gouges. Total investment was around $35 for both, and they’ve lasted five years with proper care.
The Stropping Leather Strop Technique, Step by Step
Technique is everything here. I see people strop the same way they would sand — pushing into the work with the edge leading. That’s wrong. It will embed the edge into the leather and roll the tip over immediately. Always strop with the spine leading, not the edge. You’re dragging the bevel across the leather, not slicing into it.
Setting Up the Stroke
Secure your bench strop flat on the workbench. Apply compound first if you’re loading a fresh strop. Lock your bevel angle — same angle you sharpened at, typically 25 to 30 degrees for most woodworking chisels, 20 degrees for kitchen knives, 15 to 17 degrees for razors and fine carving blades. Keeping that angle consistent is the single most important variable.
Place the spine of the blade down, flat on the strop with the bevel touching the leather. Now slide the blade away from you, spine first, in one smooth motion. Lift. Flip the blade over. Repeat on the other side. That’s one complete cycle. The stroke should be controlled and deliberate — not rushed. Medium pressure to start, lighter as you get closer to your final edge.
How Many Strokes and How Often
For a chisel coming off an 8000-grit stone, I do 10 to 15 strokes per side with compound, then 5 to 10 strokes per side on bare leather to finish. That takes about 3 minutes total. For a tool that’s just lost its edge from use but doesn’t need a full stone sharpening, 8 to 10 strokes per side on the loaded strop brings it right back. I strop my carving tools every 15 minutes of active use. For kitchen knives, I strop after every other use.
Here’s what I learned the hard way: too many strokes with heavy compound will round the very tip of the edge. I once overdid a set of Japanese chisels — 30-plus strokes with aggressive compound — and I actually made them worse. Now I follow a simple rule. When the blade shaves arm hair cleanly, stop. You’ve achieved what you came for. More stropping at that point is subtraction, not addition.
Stropping Compounds: What to Use and Why It Matters
Bare leather strops work for touch-ups and final polish. However, for serious edge refinement after stone sharpening, you need a stropping compound. These are abrasive pastes or bars loaded with very fine abrasive particles — most commonly chromium oxide (green compound) or iron oxide (red compound). Green is finer. Red is slightly more aggressive. Both serve different stages of the process.
Green compound is my default for woodworking tools and kitchen knives. Chromium oxide runs around 0.5 microns particle size — finer than most finishing stones. It polishes the bevel to a near-mirror finish and removes that last wire edge efficiently. Red compound, typically aluminum oxide or iron oxide at 1 to 2 microns, is better as an intermediate step between coarser stones and a green compound finish.
The Compound I Reach for First
After trying six or seven different compounds over the years, I keep coming back to the SHARPAL 208H Polishing Compound Fine Green Buffing Compound 2-Pack. Each pack is 53 grams — 106 grams total — and it applies cleanly without crumbling or greasing up. The consistency is firm but not waxy. It loads into leather evenly on the first pass and doesn’t require re-application constantly like some of the cheaper bars I’ve used.
I’ve run this compound on carbon steel chisels, high-speed steel plane irons, and stainless kitchen knives. It performs consistently across all three. One bar lasts me about eight to ten months of regular shop use, and the two-pack means I’ve got a backup ready. At the current price point — typically around $10 to $12 for the pair — it’s genuinely one of the best values in my sharpening kit. I keep one bar dedicated to woodworking tools and one to kitchen blades to avoid cross-contamination of food surfaces.
As a runner-up option, the BeaverCraft Stropping Compound Kit (P03) is worth considering. It includes red, white, and green compounds in one kit — useful if you want to experiment with a full compound progression or if you’re working with softer steels that benefit from a lighter touch. It’s a solid beginner kit. That said, I find myself defaulting to single-compound green once I know my workflow, which is why I settled on the SHARPAL as my main go-to.
Common Stropping Mistakes and How to Avoid Them
Beyond the edge-leading stroke error I already mentioned, the most common mistake I see is inconsistent angle. People start a stroke at the right angle and lift the spine mid-stroke. That creates a convex micro-bevel — technically called a “rolled” or “dubbed” edge. It can feel sharp but it’s geometrically wrong and dulls faster. Lock your wrist. Think of the bevel as a sled on a track. Don’t let the tail of that sled lift.
Overloading compound is another issue. A light coat of compound on the strop is all you need. More is not better. Heavy compound application builds up residue, clogs the leather pores, and actually reduces abrasive contact. I apply compound every 20 to 30 stropping sessions — not every session. When the leather looks gray-black from steel swarf buildup, wipe it down with a damp cloth, let it dry fully, and re-apply a fresh thin coat.
Neglecting the strop itself is the third big mistake. Leather is organic. It dries out, cracks, and loses its texture. Condition your strop every few months with a light application of neatsfoot oil or leather conditioner. Don’t use mink oil — it’s too soft and will over-condition the surface. Proper care means a quality strop can last 10 to 15 years without losing performance. I’ve got one bench strop that’s been in service since 2017 and still performs perfectly.
When to Skip the Strop and Go Back to the Stone
Stropping is maintenance and refinement. It is not a sharpening tool. This distinction matters. If your edge has a visible nick, a chipped section, or is so rolled from use that it catches on a thumbnail instead of gliding, no amount of stropping will fix it. You need to go back to a medium stone — typically 1000 to 2000 grit — and rebuild the edge geometry first.
Specifically, for chisels used in chopping mortises or heavy work, I check the edge every 45 minutes of active use. If a few passes on the strop restore the edge, I continue. However, if I need more than 20 strokes to get the shave test passing again, I go back to a 4000-grit stone for a quick touch-up before finishing on the strop. The strop is the last 5% of the process — not a shortcut around the other 95%.
For complete edge failure — like a chisel dropped on concrete or a knife used to pry — start at 220 to 400 grit to remove the damage, work through your normal progression, and finish on the strop. Trying to save time by going straight to a fine stone or the strop just wastes your effort and ruins compound bars faster.
Final Thoughts on the Stropping Leather Strop Technique
The stropping leather strop technique is the simplest, cheapest upgrade you can make to your sharpening routine — and it has the highest return on investment of any step in the process. A decent bench strop runs $20 to $40. A two-pack of quality green compound costs around $10 to $12. For under $50 total, you can take any edge from adequate to genuinely impressive.
What I want you to take away from this post is simple. Stropping is not optional. It’s not advanced. It’s the step that separates working edges from working edges that feel like cheating. Three minutes of correct stropping after your stone work will change your relationship with every sharp tool in your shop.
Start with a flat bench strop on a wooden backing, load it with a quality green chromium oxide compound like the SHARPAL 208H, lock your bevel angle, and always — always — stroke spine-first. Do that consistently for a month. Your tools will perform at a level that surprises you, and you’ll never skip this step again. That’s a promise from eight years of getting it wrong before I got it right.
This post contains affiliate links. As an Amazon Associate, I earn from qualifying purchases at no extra cost to you.