
How to Forge a Knife for Beginners: What You Need, What to Expect, and Your First Blade
The angle grinder is screaming, and I’m watching sparks rain down across the workbench as I grind the profile on what’s supposed to become a blade. My first attempt at this — years back now — was rebar. Catastrophically wrong choice. I quenched it carelessly, flexed it to test the hardness, and it shattered like overcooked glass. The twisted remains still lean against a shelf, gathering dust next to the small utility knife that actually worked. The lesson isn’t complicated: you will fail at this, and those failures cost almost nothing if you start with your head on straight.
Inbox messages keep landing about blade-making. Some arrive from people paralyzed by equipment lists they’ve read. Others come from folks who’ve already dropped three grand on forge and anvil setups without knowing whether they’d actually stick with the work. This piece addresses both camps.
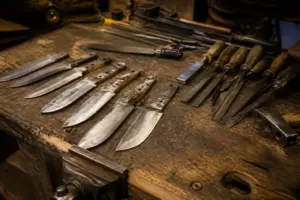
Two distinct paths exist for making a knife: forging (taking steel red-hot and shaping it under a hammer) and stock removal (beginning with finished bar material and reducing it through grinding and filing). Each produces legitimate, high-performance blades. Each has merit. We’ll explore both here, with forging taking center stage — though I’ll also walk you through the stock removal shortcut if you haven’t secured forge access just yet.
The Basic Process: Nine Steps from Blank to Blade
Understanding what actually happens across the knife-making journey matters before we discuss equipment. Below is the complete sequence:
- Select your steel — Typically 1084, salvaged files, or automotive suspension components.
- Place the steel in the forge until it reaches working temperature — Heat sufficiently for shaping (usually in the orange to yellow spectrum).
- Strike the heated steel into preliminary blade form — The forging phase. You’re lengthening the tang and blade body, establishing a tip.
- Normalize or anneal the workpiece — Reheat and permit controlled cooling. This reduces hardness, making subsequent grinding more manageable.
- Perform profile grinding — Strip material and establish the silhouette using power tools or hand files.
- Execute bevel grinding — Establish the cutting geometry. This transforms a metal shape into something capable of holding an edge.
- Execute hardening and tempering cycles — The decisive phase. Without it, you possess an oddly-proportioned metal object. With it, you possess a working blade.
- Accomplish finishing work and polish — Refine the appearance after hardening. This phase typically involves filing, sanding, and persistence.
- Construct and install the handle — Attach scales, crossguard, fasteners, or other components as desired. The metal portion is finished.
Intimidating at first glance. The timeline extends further than anticipated but moves faster than your imagination.
What Steel Should You Actually Use?
This decision separates amateur missteps from sound beginnings. I stumbled here myself.
1084 / 1080 High Carbon Steel: The Beginner’s Best Friend
Purchase this. Online metalworking retailers stock it at $10-15 per blade’s worth. The heat-treatment protocol remains uncomplicated — no extended soak windows, no obscure temperatures. Bring it to the point where magnetism vanishes (approximately 1475°F with 1084), plunge it into preheated canola oil or Parks 50, and finish with a standard kitchen oven cycle. It functions reliably. I’ve completed many blades using 1084. So have countless others starting out.
Search the terms “1084 steel bar” across any metalworking merchant and abundance appears. Indicate your preferred thickness (1/8″ suits smaller blades nicely). Delivery arrives within seven days.
Old Files: The Free Option
A low-cost file from an estate sale typically contains W1 or material comparable to 1095 — both exceptional blade materials. The requirement: annealing beforehand. Reach the file’s color to light orange (roughly 1400°F) and permit slow cooling within vermiculite, sand, or even fireplace ash. Hours pass during this cycle. Post-annealing, it responds beautifully to grinding and finishing, and the hardening sequence closely mirrors 1084 protocols.
This represents a legitimate path. I’ve pursued it. Recycled files present one constraint: shorter length means a compact finished blade. For an inaugural project, that limitation poses no barrier.
Leaf Springs and Coil Springs: For Tougher Blades
Suspension coils from automobiles frequently consist of 5160 steel — durable, tolerant, and slightly more demanding during heat-treat than 1084 though fully achievable at home. Junkyard sources provide them freely or near-freely. Trade-offs include thickness and mass, which complicates grinding on amateur equipment.
Reserve 5160 for your second or third project.
What NOT to Use
Rebar: Unspecified alloy composition. Unpredictable hardening performance. Resembles a knife shape, functions nowhere near. I discovered this through painful trial.
Stainless varieties: Home-based hardening impossible without specialized apparatus. Abandon this thought.
Mower cutting blades: Typically low in carbon content. Cannot sustain an edge acceptably.
Unidentified salvaged metal: That fastener, that scrap piece you discovered, anything unmarked — refrain. Composition significantly influences results. Drastically.
The Spark Test: Five Seconds to Know Your Steel
Direct the steel against a bench grinder and observe the resulting spray. Brilliant, branching, nearly violent sparks = carbon-rich metal (desirable). Dull, abbreviated yellow shower = carbon-deficient (undesirable). Rough methodology, but dependable.
The Minimal Tool List: What You Actually Need
Full transparency: forging demands heat. Yet five figures in tools remain unnecessary for launching the endeavor.
The Forge: Non-Negotiable for Forging
Heat delivery is mandatory. Below are practical pathways, ascending by expense:
- Coffee can forge (~$60-80): Pair of coffee cans, kaowool ceramic insulation blanket, rigidizer compound, propane burner. Unorthodox appearance. Outstanding results. Capable of achieving weld-capable temperatures. Thousands of inaugural blades have emerged from these contraptions. Jake’s Forge on YouTube provides unmatched construction documentation.
- Brake drum forge (~$0-30): Discarded brake drum sourced from salvage operations, hair dryer or mechanical blower for air circulation, charcoal or coal fuel. Negligible expense if components are scavenged. Performs superbly with modest blades. Takes extended heating time versus propane alternatives but burns economically.
- Manufactured compact forge (~$200-350): Brands including Hells Forge, Atlas Forge, equivalents. Pre-assembled. Predictable output. Justifiable expense for serious pursuers seeking to bypass DIY complications.
- Standard kitchen-grade propane torch: Insufficient. Steel reaches warmth but lacks forgeability. Disappointment follows investment of hours.
The Anvil: Something Hard and Heavy
A unyielding striking surface becomes necessary. Flawlessness remains optional.
- Salvage yard rail sections: Complimentary or minimal cost from scrappers. Set one end upright within wooden base material. Exceeds 100 lbs of metal. Compromises include missing features (horn, hardie openings) yet functionality persists.
- Forklift tine sections: Steel cut from retired forklift tines represents premium density and appearance. Junkyard operators will part with these inexpensively. Mount atop wooden foundation.
- Manufactured anvils (55-100 lbs): Cast iron “apprentice” versions available at discount retailers for $70-100 and sufficient for initial learning. Peddinghaus, Ridgid, Nimba manufacture superior alloy options. Long-term investment pays dividends, though three-figure expenditure remains unnecessary initially.
- Steel plate sections (2″ thickness): Secure a 12″ by 6″ by 2″ plate to wooden support. Serviceable for knife-dimension tasks. Unglamorous. Functional.
The Hammer
A 2-2.5 lb cross-peen configuration (Swedish model resemblance) offers maximum versatility for blade work. Rounded-head hammers excel at lengthening. Ball-peen adapts acceptably. Avoid massive sledges initially — fatigue and control deteriorate quickly.
Tongs
Pliers cannot secure heated metal safely. Slippage precedes accidents. Blacksmith-pattern tongs remain obligatory. Bolt varieties function well for bar material. V-notch or multipurpose wolf jaw designs increase flexibility. Budget $20-30 per pair. Absolutely essential.
Angle Grinder
Profile shaping follows forging completion. A 4.5″ or 5″ machine with 40-grit flap disc expedites material removal. Discount suppliers market units for $30-40. It becomes the shop’s workhorse.
Files
Post-grinding refinement requires quality files. A medium-coarseness bastard file manages most tasks. Individual units cost $5-10. Assemble a trio: 10″, 8″, and 6″ lengths. Daily utility is constant.
A Belt Grinder (Optional But Awesome)
Not required for entry-level work, yet a 1×30 or 2×72 belt system accelerates bevel creation substantially. The 1×30 discount-brand option retails at approximately $60 and serves adequately during the learning phase. A 2×72 from established manufacturers runs $250-400 and justifies the cost if commitment emerges. Nevertheless, angle grinder and file combinations can deliver finished blades without power-assist beveling.
Actually Forging the Blade: The Simplified Steps
For the inaugural effort, embrace simplicity: a modest utility design, 3.5-4″ cutting surface, metal extending through the handle length entirely. Skip curves, decorative channels, complex patterning. Keep it basic — level spine, level edge, elementary proportion.
Step 1: Heat the Steel
Bring the metal to orange or pale yellow inside the forge. Bright surroundings conceal color—dim conditions reveal it clearly. Orange signals readiness. White indicates overheating and material degradation. Monitor continuously.
Step 2: Draw Out the Tang
Begin hammering to shape the handle segment initially, progressing toward the blade terminus. Employ slanted impacts—angled strikes extend the metal rather than concentrating force. The sensation requires repetition to master. Expect irregular results initially. Progress continues regardless.
Step 3: Rough the Bevels
Employ hammer face-strikes to initiate edge thinning. You’re not generating sharpness yet — you’re establishing sufficient taper so grinding proceeds faster. Complete bevel forging remains possible but demands focus and precision. Most contemporary practitioners forge preliminary shape and accomplish final edge-geometry through grinding.
Step 4: Forge the Point
Extend the tip into basic point configuration. Even proportions remain insignificant presently.
Step 5: Normalize
Enable gradual cooling or execute normalize repetitions: reach non-magnetic coloration (orange zone), surface-cool, perform two additional cycles. This process releases built-up tension and streamlines subsequent grinding phases.
From Here: Grind and Heat Treat
Rough-profile using the angle grinder toward general shape. Bevel-establish (through filing or powered belts) toward blade appearance. Proceed to hardening. Details arrive below.
Heat Treatment: The Part That Actually Matters
Flawless forging undermined by mishandled hardening produces waste material. I’ve walked that path. Prevent it.
The Process (for 1084)
- Bring to critical temperature: Raise the blade’s heat until magnetism ceases. Suspend a magnet inches from the forge work. The metallurgical transition occurs around 1475°F for 1084. This represents your quenching moment.
- Submerge swiftly: Direct the blade downward into preheated canola oil (130°F target) or Parks 50 cooling liquid. Execute gentle rocking movements throughout approximately 10 seconds. Warping occasionally manifests. Accommodate it. Correct deformation immediately while metal remains hot, striking gently with your hammer.
- Temper without delay: Situations the knife in a standard kitchen oven maintaining 400°F across two consecutive one-hour sessions. Cool between intervals (thirty-minute typical duration). Omitting this stage creates hardness with brittleness — the blade shatters upon bending.
How to Know It Worked
Post-tempering, apply gentle flexing pressure to the blade. Spring-like recovery without fracture indicates success. Attempt filing a corner with your bastard file — it should slide across without catching. If the file bites and removes material readily, hardening failed. Repeat the heat-treat sequence.
Snapping occurs when tempering remains incomplete. Reheating becomes necessary.
The Stock Removal Alternative: Forging Without a Forge
No forge access currently? Progress remains achievable. The stock removal method performs excellently. No heating phases. No hammering sequences. Begin with finished bar material and subtract through grinding and filing procedures.
The Process
- Procure 1084 in desired thickness (1/8″ serves smaller designs, 3/16″ accommodates larger versions).
- Transfer knife silhouette onto bar material.
- Extract outline via angle grinder or handsaw. Machine handle attachment points.
- Accomplish edge geometry through filing or powered sanding belts.
- Execute hardening exactly per previous guidelines.
- Complete through filing, sanding sequences, and persistence.
Resulting blades prove indistinguishable from hammer-created versions to the vast majority. Numerous established professionals work exclusively in this technique. It constitutes not a shortcut or compromised approach — a legitimate methodology generating outstanding implements.
Commence here should forge access remain unavailable.
Your First Knife Will Be Ugly. Make It Anyway.
The typical beginner pitfalls involve neither striking technique nor slanted edges. They involve skipping the hardening phase (“I’ll simply use it soft,” you won’t), gambling on unidentified materials (“Probably contains sufficient carbon,” it doesn’t), or postponing action awaiting conditions never materializing.
Your inaugural blade will disappoint you slightly. The spine may deviate from perfection. The profile won’t achieve symmetry flawlessly. The handle attachment may require adjustment. Produce it regardless. Single completed, hardened, functional blades deliver more education than infinite online resources.
That rebar failure still occupies shelf space in my workspace. Alongside it rests my second attempt — a compact 3.5″ utility blade forged from 1084, hammered atop salvage rail, ground using my angle grinder, created inside a coffee-can forge. Beauty remains absent. Sharpness prevails. Utility confirmed. Fabricated entirely by my labor.
That’s fundamentally everything that matters.
Frequently Asked Questions
What temperature should I heat 1084 steel before quenching?
Bring 1084 to approximately 1475°F, which is when magnetism vanishes. Suspend a magnet inches from the forge work to identify this critical temperature transition point. White heat indicates overheating and material degradation, so monitor continuously in bright or dimly lit conditions.
Can I make a knife without a forge using stock removal?
Yes, stock removal is a legitimate methodology. Procure 1084 bar material in your desired thickness, transfer the knife silhouette onto it, extract the outline via angle grinder or handsaw, accomplish edge geometry through filing or sanding belts, then execute hardening identically to forged blades. Resulting blades prove indistinguishable from hammer-created versions.
Why shouldn’t I use rebar for my first knife blade?
Rebar contains unspecified alloy composition with unpredictable hardening performance. It resembles a knife shape but functions nowhere near acceptably. The material cannot reliably sustain an edge, making it a catastrophically wrong choice for beginners despite its availability.
How long does normalizing take after forging a blade?
Normalizing involves reaching non-magnetic coloration, surface-cooling, then performing two additional heating and cooling cycles. Hours pass during this complete process. Normalizing releases built-up tension and streamlines subsequent grinding phases before hardening and tempering.
Sources and further reading
About This Article

Written by Garrett Dunn. Hobbyist metalworker and garage workshop builder. I restore old tools, weld custom furniture, and document my projects and mistakes so other makers can learn from both. More about this site.
Scope and limits. Garrett is a hobbyist metalworker, not a certified welder or machinist. Welding, grinding, and solvent work carry real injury risk — use the correct PPE and ventilation, and follow the manufacturer safety guidance for your own equipment.
Verify this against a primary source
Specifics change, and your situation may differ from the one described here. These are the authorities worth checking directly:
- OSHA — machine guarding, PPE and shop safety standards
- American Welding Society — welding procedure and safety standards